Set Up a Data Collection and Annotation Framework for Multi-Site Behavioral Studies
Reproducible neuroimaging principles: 2c: Annotate data.
Actions: Standards, Annotation and provenance.
Standards: BIDS.
Tools: ReproSchema.
Challenge
Managing multi-site behavioral research projects presents significant challenges that can compromise data quality and research outcomes:
- Version Control Chaos: When questionnaires change mid-study, tracking which version each participant completed becomes nearly impossible without proper systems.
- Cross-Site Inconsistencies: Different research sites may interpret or implement the same assessment differently, leading to incomparable data.
- Data Harmonization Nightmares: Combining data from multiple sources often requires months of manual cleanup and reconciliation.
- Reproducibility Barriers: Without proper documentation and standardization, recreating a study or validating findings becomes extremely difficult.
ReproSchema addresses these challenges by providing a standardized, version-controlled framework for organizing and annotating behavioral data. It integrates seamlessly with existing tools while ensuring data remains consistent, traceable, and ready for both immediate analysis and long-term reuse.
Exercise
In this tutorial, you will learn how to use ReproSchema to:
- Understand ReproSchema’s Architecture: Master the five core components and how they work together to standardize data collection.
- Design a Custom Data Collection Framework: Create schemas tailored to your specific research needs while maintaining compatibility with common standards.
- Implement Version Control: Track every change to your assessments, ensuring complete reproducibility of your data collection methods.
- Deploy Your Protocol: Set up a working data collection system that can be used across multiple sites and devices.
By the end of this tutorial, you will have created a functioning ReproSchema protocol, tested it locally, and understand how to deploy it for real-world data collection. You’ll also gain practical strategies for managing complex multi-site studies and ensuring long-term data usability.
Before you start
Knowledge Assumed:
- Basic GitHub Usage: You should be comfortable navigating GitHub repositories, cloning projects, and understanding version control basics, see here. If you’re new to GitHub, review the GitHub Getting Started Guide
- Command Line Fundamentals: Ability to run bash commands, navigate directories, and execute Python scripts. Refresh your bash knowledge with this Bash Command Cheat Sheet
- JSON Familiarity (Helpful): Basic understanding of JSON structure will help, though we’ll provide examples for all code. Familiarize yourself with JSON basics for editing schema files
Required Software:
- Git: For version control and accessing repositories
- Python 3.9+: For running ReproSchema tools and pipx
- Node.js and npm: For testing the user interface locally
- Text Editor: Any code editor (VS Code, Sublime Text, etc.)
Step by step guide
Step 1: Understand ReproSchema’s Architecture
ReproSchema uses a hierarchical structure to organize assessments, making complex protocols manageable and reusable:
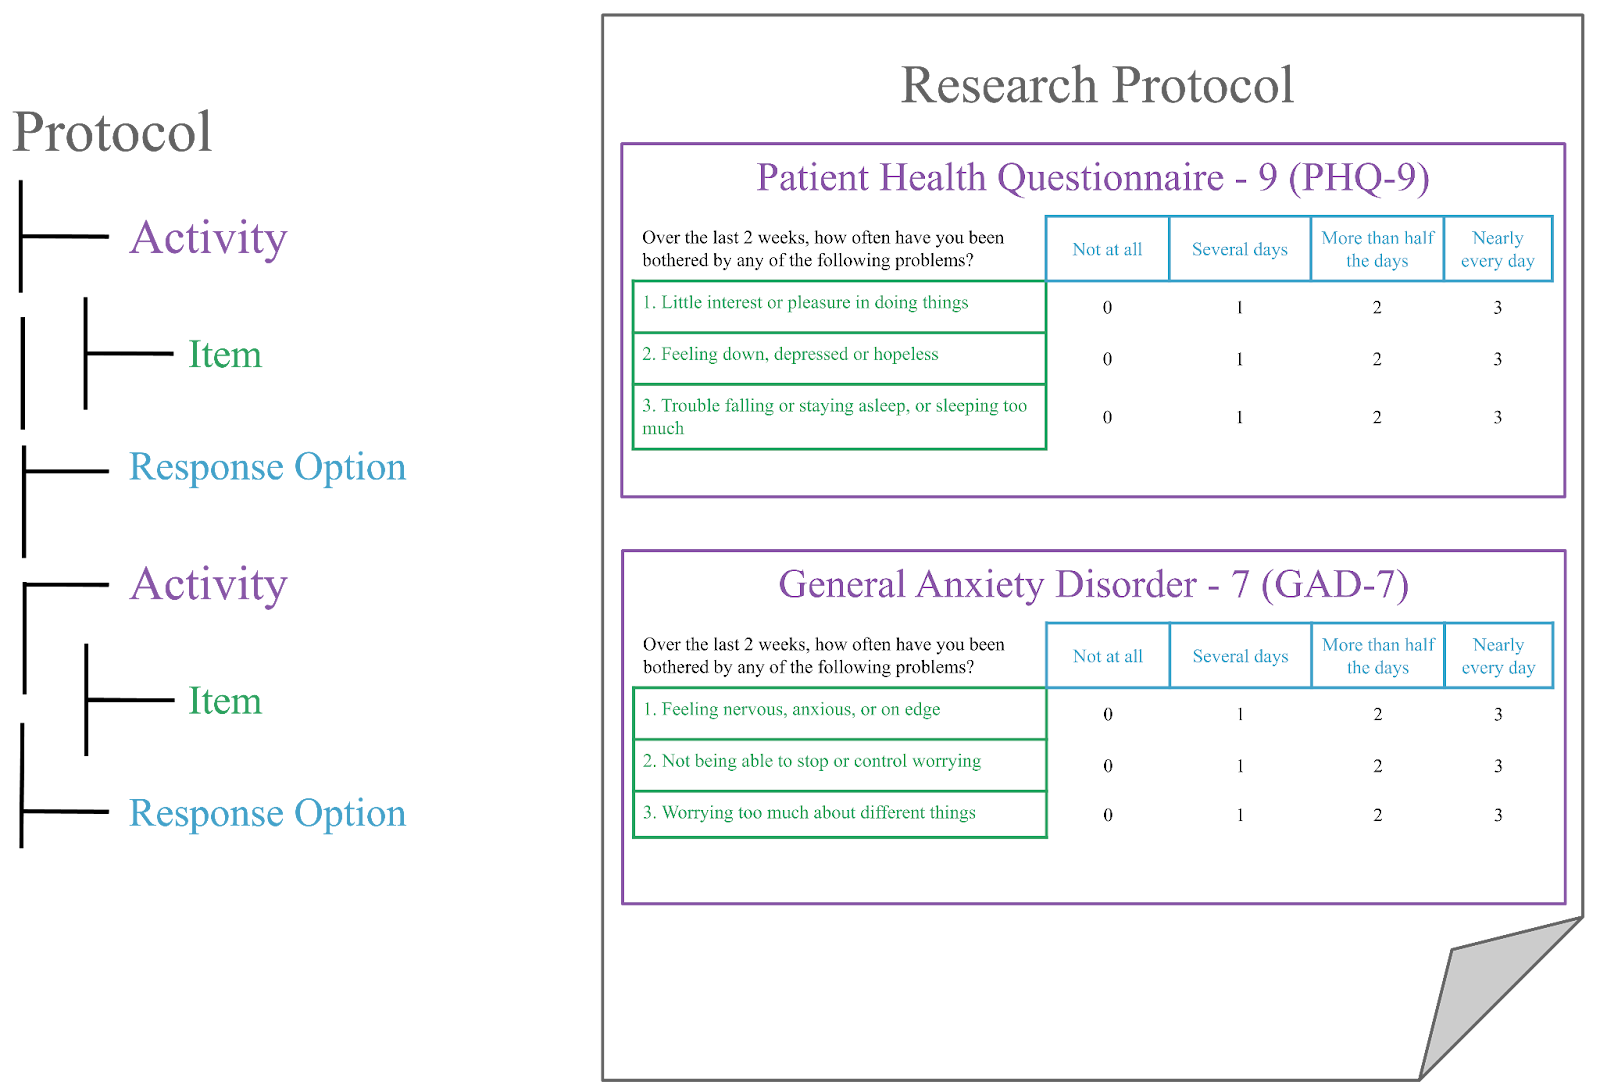
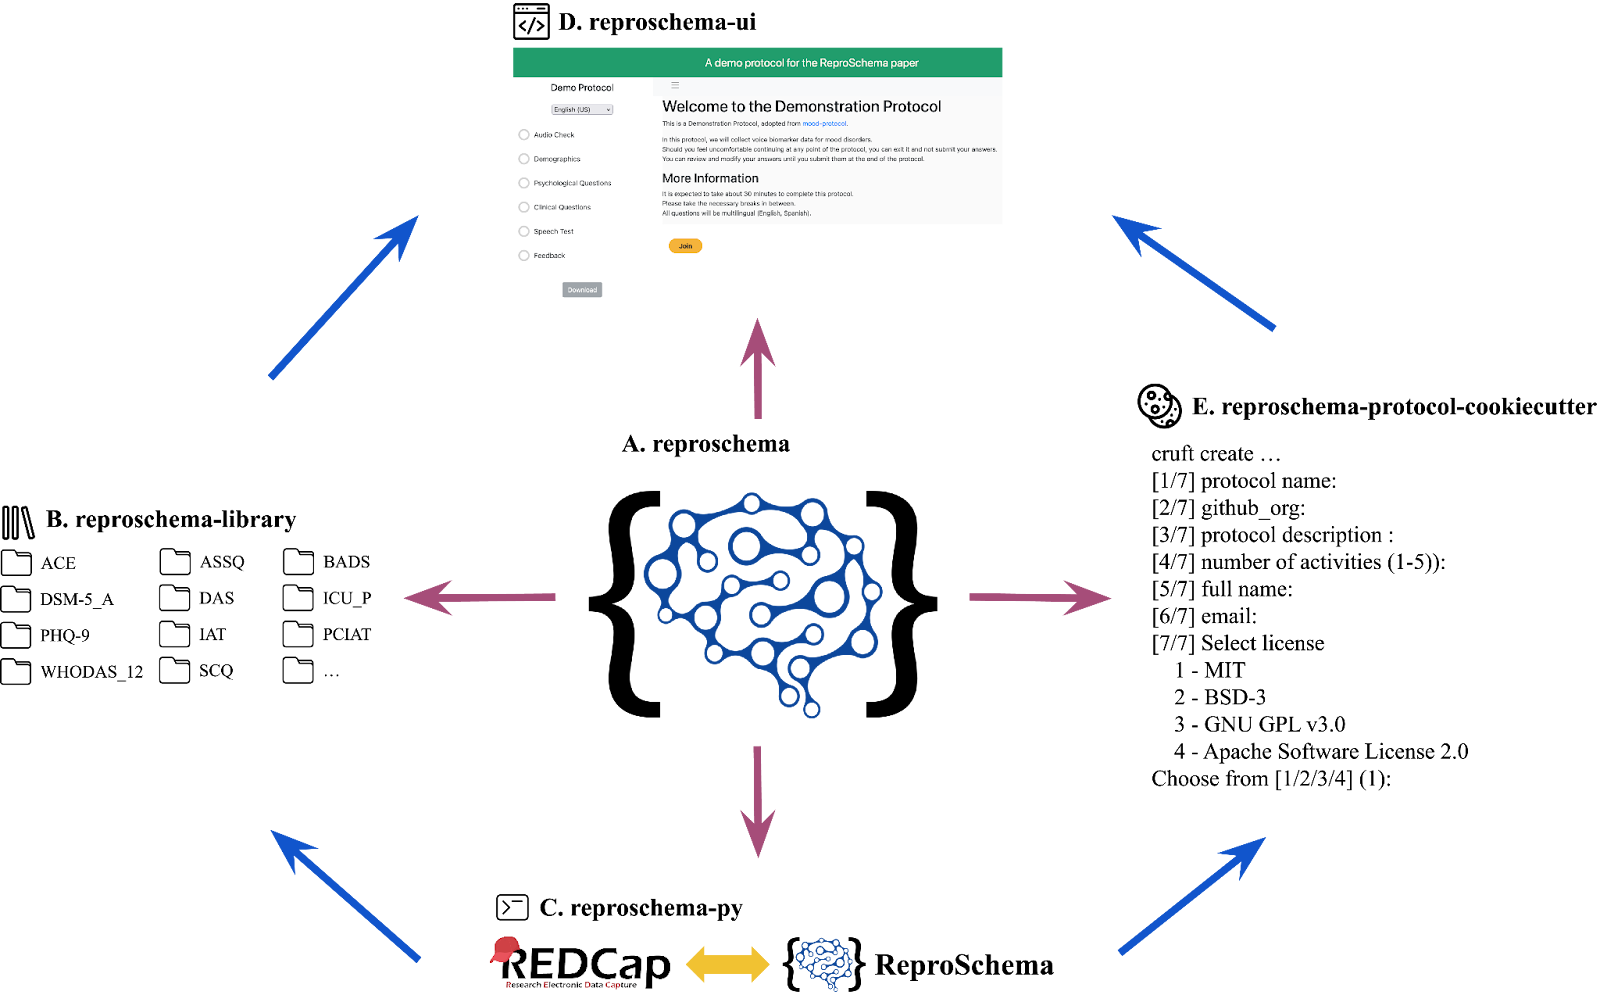
The Five Core Components:
Foundational Schema (reproschema)
- Defines the structure: Protocol → Activity → Item
- Uses JSON-LD format for semantic clarity
Assessment Library (reproschema-library)
- Pre-built standardized assessments (PHQ-9, GAD-7, WHODAS, etc.)
- Version-controlled and validated
- Ready to use without modification
Python Toolkit (reproschema-py)
- Create and validate schemas
- Convert between formats (REDCap ↔ ReproSchema)
- Command-line tools for automation
User Interface (reproschema-ui)
- Web-based data collection platform
- Supports multimedia, branching logic, and scoring
- Works on desktop and mobile devices
Protocol Template (reproschema-protocol-cookiecutter)
- Quick-start template for new projects
- Proper folder structure and examples
- Built-in best practices
Step 2: Explore a Demo Protocol
Before creating your own protocol, explore what’s possible:
Visit the Demo: ReproSchema UI Demo
Try Different Features:
- Text and numeric inputs with validation
- Multiple choice questions with branching logic
- Likert scales and visual analog scales
- Audio recording capabilities
- File upload functionality
- Computed scores and progress tracking
Examine the Code: Clone the demo to see how it’s built:
git clone https://github.com/ReproNim/demo-protocol
cd demo-protocol
# Explore the structure
The
DemoProtocolfolder contains the schema at the protocol level. Theactivitiesfolder holds the schema for each activity. Theui-changes/srcfolder enables rendering the UI components.
Step 3: Plan Your Data Collection Framework
Create a Requirements Document:
Start with a spreadsheet outlining your assessments:
| Variable Name | Question Text | Type | Required | Validation | Branching Logic |
|---|---|---|---|---|---|
| participant_id | Participant ID | text | Yes | Alphanumeric, 6 chars | None |
| age | What is your age? | number | Yes | 18-100 | None |
| has_diabetes | Do you have diabetes? | radio | Yes | None | None |
| medication | What medication? | text | No | None | Show if has_diabetes = Yes |
Check Available Assessments:
Before creating new items, browse the library of available assessments.
Common assessments include:
- Demographics (age, gender, ethnicity)
- Mental Health (PHQ-9, GAD-7, PSS)
- Cognitive (Trail Making, Digit Span)
- Physical Health (WHODAS, pain scales)
Step 4: Create Your Project
Option A: Use the Cookiecutter Template (Recommended)
# Install required tools
pip install pipx
pipx install cruft

# Generate your project
cruft create https://github.com/ReproNim/reproschema-protocol-cookiecutter
You’ll be prompted for:
- protocol_name: my_study
- protocol_display_name: My Research Study
- protocol_description: A study examining…
This creates:
my_study/
├── my_study_schema        # Main protocol definition
├── activities/            # Your assessments
│   └── example/
│       ├── example_schema
│       └── items/        # Individual questions
├── README.md
└── protocols
Option B: Convert from REDCap
If you have existing REDCap instruments:
# Install the converter
pip install reproschema

# Convert your data dictionary
reproschema redcap2reproschema \
    --csv-path my_redcap_dictionary.csv \
    --output-path my_study/ \
    --protocol-name "My Study"
Step 5: Build Your Assessments
Create a New Activity (Assessment):
Make the directory structure:
cd my_study
mkdir -p activities/screening/items
Create the activity schema (
activities/screening/screening_schema):{ "@context": "https://raw.githubusercontent.com/ReproNim/reproschema/main/releases/1.0.0/reproschema", "@type": "reproschema:Activity", "@id": "screening_schema", "prefLabel": "Health Screening", "description": "Basic health screening questions", "schemaVersion": "1.0.0", "version": "1.0.0", "ui": { "order": [ # the order of items will be the order they appear on the screen "items/age", "items/has_diabetes", "items/medication" ], "shuffle": false, "addProperties": [ { "variableName": "age", "isAbout": "items/age", "isVis": true, "requiredValue": true }, { "variableName": "has_diabetes", "isAbout": "items/has_diabetes", "isVis": true, "requiredValue": true }, { "variableName": "medication", "isAbout": "items/medication", "isVis": "has_diabetes === 1", "requiredValue": false } ] } }Create individual items (
activities/screening/items/age):{ "@context": "https://raw.githubusercontent.com/ReproNim/reproschema/main/releases/1.0.0/reproschema", "@type": "reproschema:Field", "@id": "age", "prefLabel": "Age", "description": "Participant's age in years", "schemaVersion": "1.0.0", "version": "1.0.0", "question": "What is your age?", "ui": { "inputType": "number" }, "responseOptions": { "valueType": "xsd:integer", "minValue": 18, "maxValue": 100, "unitCode": "years" } }Update your protocol to include the new activity in
my_study_schema:{ "@context": "https://raw.githubusercontent.com/ReproNim/reproschema/main/releases/1.0.0/reproschema", "@type": "reproschema:Protocol", "@id": "my_study_schema", "prefLabel": "My Research Study", "description": "A comprehensive health screening study", "schemaVersion": "1.0.0", "version": "1.0.0", "ui": { "order": [ "activities/screening/screening_schema" ], "shuffle": false, "addProperties": [ { "isAbout": "activities/screening/screening_schema", "variableName": "screening", "prefLabel": "Health Screening" } ] } }
Step 6: Test Your Protocol Locally
Clone and set up the UI:
git clone https://github.com/ReproNim/reproschema-ui
cd reproschema-ui
npm install
Configure for your protocol: Edit
src/config.js:module.exports = { githubSrc: 'https://raw.githubusercontent.com/YOUR_USERNAME/my_study/main/my_study_schema', banner: 'My Research Study', startButton: 'Begin Assessment', assetsPublicPath: '/my_study/', backendServer: 'null' };Run the development server:
npm run serveTest thoroughly:
- Navigate through all questions
- Verify branching logic works
- Check validation rules
- Test on different devices
Step 7: Validate Your Schemas
Use reproschema-py to ensure your schemas are valid:
# Install if not already done
pip install reproschema

# Validate your protocol
reproschema validate my_study_schema

# Validate individual activities
reproschema validate activities/screening/screening_schema
Check for common issues:
- Missing required fields
- Invalid references
- Syntax errors in JSON
Step 8: Deploy Your Protocol
For Testing (GitHub Pages):
Push to GitHub:
git init
git add .
git commit -m "Initial protocol"
git remote add origin https://github.com/YOUR_USERNAME/my_study
git push -u origin main
Access via ReproSchema UI:
https://www.repronim.org/reproschema-ui/#/?url=https://raw.githubusercontent.com/YOUR_USERNAME/my_study/main/my_study_schema
For Production (With Data Storage):
Follow the backend deployment guide:
git clone https://github.com/ReproNim/reproschema-backend
cd reproschema-backend
# Follow Docker deployment instructions
Step 9: Implement Advanced Features
Add Computed Scores:
{
  "compute": [
    {
      "variableName": "total_score",
      "jsExpression": "q1 + q2 + q3 + q4 + q5"
    }
  ]
}
Multi-language Support:
{
  "prefLabel": {
    "en": "What is your age?",
    "es": "¿Cuál es su edad?",
    "fr": "Quel est votre âge?"
  }
}
Complex Branching:
{
  "isVis": "age >= 18 && (has_condition === 1 || screening_score > 10)"
}
Use cases
ReproSchema has proven its value across diverse research contexts:
1. NIMH-Minimal Initiative
- Repository: github.com/ReproNim/nimh-minimal
- Impact: Standardized NIMH common data elements across 50+ research sites
- Key Feature: Version-controlled assessments ensuring compliance with NIMH requirements
2. HEALthy Brain and Child Development (HBCD) Study
- Repository: github.com/ReproNim/hbcd-redcap2rs
- Challenge: Harmonizing clinical and behavioral data across multiple research sites studying child development
- Solution: ReproSchema framework for standardized data collection with version control
- Result: Seamless integration of diverse data types from pregnancy through early childhood
3. Bridge2AI Project
- Repository: github.com/sensein/b2ai-redcap2rs
- Focus: Multi-modal data integration for AI-ready datasets
- Innovation: Linking behavioral assessments with physiological measurements
4. eCOBIDAS Checklist
- Repository: github.com/ohbm/eCOBIDAS
- Transformation: 71-page PDF → Interactive web checklist
- Result: 80% reduction in time to complete neuroimaging best practices review
Next steps
You’ve now learned how to create, test, and deploy a ReproSchema protocol. Here’s how to continue your journey:
Immediate Actions
- Start Small: Create a simple demographic questionnaire to practice
- Explore the Library: Find assessments you can reuse immediately
- Join the Community: Star the GitHub repos and watch for updates
Advanced Learning
- Study Real Implementations: Examine the NIMH-Minimal or HBCD repositories
- Contribute Back: Submit your validated assessments to the library
- Extend Functionality: Create custom UI components for specialized needs
Get Support
- Documentation: repronim.org/reproschema
- GitHub Issues: github.com/ReproNim/reproschema/issues
ReproSchema is continuously evolving with community input. Your experience and feedback help shape its future development. Start building your standardized data collection system today and join the growing community of researchers committed to reproducible science!